ClipCascade (Eine Netzwerkzwischenablage mit Server)
Installastion ClipCascade Server
Beschreibung:
ClipCascade ist ein Selfhost-Server mit dem sich eine Zwischenablage Synchronisieren lässt.
Vorrausetzungen:
Wir brauchen wieder eine Feste IP und einen DNS-Namen
Installation:
Server installation:
apt install docker.io docker-compose curlVerzeichnis erstellen
mkdir /root/clipcascadenun die .env Datei erstellen
nano /root/clipcascade/.envVariablen Tabelle
For a comprehensive list of available environment variables, refer to the Advanced Details section.
| Variable | Description | Default Value | Example |
|---|---|---|---|
CC_MAX_MESSAGE_SIZE_IN_MiB |
Defines the maximum allowed message size in MiB. Ignored if CC_P2P_ENABLED is set to true. |
1 |
3 |
CC_ALLOWED_ORIGINS |
Specifies the allowed CORS origins for secure cross-origin access. | * |
https://clipcascade.example.com |
CC_P2P_ENABLED |
Enables or disables peer-to-peer mode. When enabled, CC_MAX_MESSAGE_SIZE_IN_MiB is ignored. |
false |
true |
CC_SIGNUP_ENABLED |
Allows or restricts user self-registration. | false |
false |
CC_PORT |
Specifies the port on which the server listens for incoming connections. | 8080 |
1234 |
Inhalt:
WICHTIG: CC_ALLOWED_ORIGINS ist auch die Public URL für Caddy also Pflicht
CC_MAX_MESSAGE_SIZE_IN_MiB=100
CC_ALLOWED_ORIGINS=https://clipcascade.example.com  # Defines allowed CORS origins for security
CC_SIGNUP_ENABLED=false  # Enables or disables user self-registration
CC_P2P_ENABLED=false
Nun die Composer Datei
nano /root/clipcascade/docker-compose.ymlInhalt
services:
  clipcascade:
    image: sathvikrao/clipcascade:latest
    #ports:
    #  - "8080:8080"  # Expose the ClipCascade server on port 8080
    restart: always  # Automatically restart the container if it stops
    volumes:
      - ./cc_users:/database  # Persistent storage for user data
    environment:
      - CC_MAX_MESSAGE_SIZE_IN_MiB=${CC_MAX_MESSAGE_SIZE_IN_MiB}   # Maximum message size in MiB (ignored if P2P mode is enabled)
      - CC_P2P_ENABLED=${CC_P2P_ENABLED}  # Enables or disables peer-to-peer(P2P) mode
      - CC_ALLOWED_ORIGINS=${CC_ALLOWED_ORIGINS}  # Defines allowed CORS origins for security
      - CC_SIGNUP_ENABLED=${CC_SIGNUP_ENABLED}  # Enables or disables user self-registration

  caddy:
    image: caddy:latest
    restart: always
    ports:
      - "80:80"
      - "443:443"
      - "8080:80"
    command: caddy reverse-proxy --from ${CC_ALLOWED_ORIGINS} --to clipcascade:8080
    volumes:
      - ./data/caddy/data:/data
      - ./data/caddy/config:/config
Nun den container starten
cd /root/clipcascade/
docker-compose up -d
Konfiguration:
Kennwort ändern:
- Default Credentials:
- Username:
admin - Password:
admin123
- Username:
Nun das Kennwort ändern im Menü oben change Password

Benutzer anlegen:
Dazu auf Add user klicken

Daten eingeben und auf submit klicken

Nun erscheint der Benutzer in der Liste

Nun noch die ufw Firewall regeln anpassen.
Da hier der Docker container sowieso von außen erreichbar sein soll, brauchen wir hier keine Anspassung für docker.
Aber ssh soll nur auf der lokalen Netzwerkkarte zur Verfügung stehen
ufw installieren
apt install ufwNun die Regeln setzten, darauf achten das enp6s18 die interne Karte ist ansonsten anpassen
ufw allow in on enp6s18 to any port 22
ufw enable
Installation Clients
BeschreibunG:
Die Instalaltion für die Verschiedenen Clients
Welche Clients gibt es:
- Windows
- Linux (Sogar mit GNOME Extension für Systemtray)
- MacOS
- Android
Installation:
Linux:
Debian/Ubuntu:
sudo apt update
sudo apt install -y python3 python3-pip python3-gi xclip wl-clipboard dunst
sudo apt install -y python3-gi-cairo gir1.2-gtk-3.0 gir1.2-gdk-3.0
sudo apt install -y python3-xxhash python3-pyperclip python3-requests python3-websocket python3-pycryptodome python3-tk python3-pystray python3-pyfiglet python3-bs4 python3-plyer python3-aiortc
sudo apt install -y libavformat-dev libavcodec-dev libavdevice-dev libavutil-dev libavfilter-dev libswscale-dev libswresample-dev pkg-config
sudo ln -s /usr/lib/python3/dist-packages/Cryptodome /usr/lib/python3/dist-packages/Crypto
Nun auf der Realse Seite den Clinet runter laden:
https://github.com/Sathvik-Rao/ClipCascade/releases
Hier zum Zeitpunkt der Erstellung des Artikel link : https://github.com/Sathvik-Rao/ClipCascade/releases/download/3.0.0/ClipCascade_Linux.zip
Dieses Entpacken an euer gewünschtes Ziel.
Mein Vorschlag.
Erstellt im Home Verzeichnis ein Verzeichnis .programme und schiebt es dort rein.
Nun einmal im Terminal das Programm manual starten damit das Setup erscheint.
Denn den starter den wir gleich anlegen startet das Programm im Hintergrund
Deshalb erstmal manuell starten im Terminal
cd /home/<username>/.programme/ClipCascade/
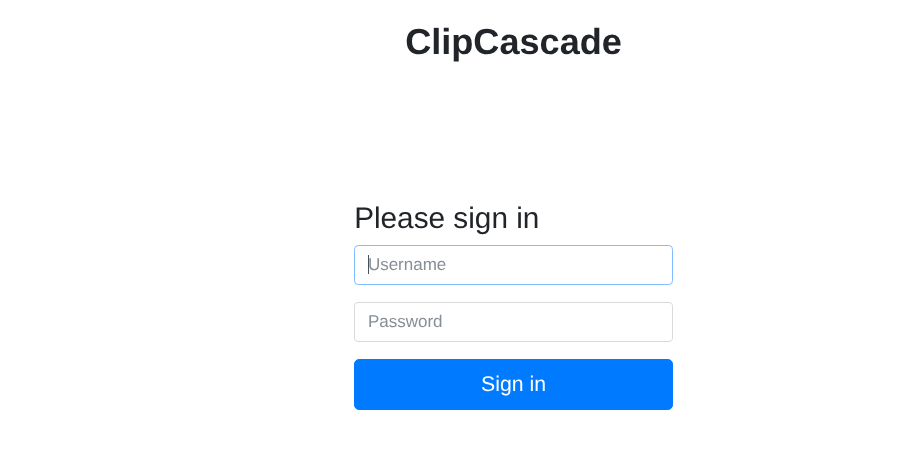
python3 main.pyDort die Daten eintragen und auf Login klicken

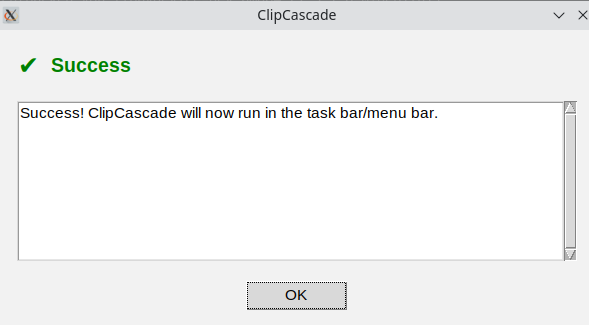
Wenn die Daten richtig sind, sollte Verbunden kommen.
Das Programm läuft in dem Systemtray weiter
Nun erstellen wir eine start.sh die das Programm im Hintergund ausführt
Diese startet dann im Hintergrund
nano ~/.programme/ClipCascade/start.shInhalt
cd /home/<username>/.programme/ClipCascade && nohup python3 main.py &> /dev/null &nun ausführbar machen
chmod +x ~/.programme/ClipCascade/start.shAutostart
in KDE:
Im Menü Austostart eingeben und auf Hinzufügen klicken

Dann auf Anmedlungsscript hinzufügen klicken

Fertig
