Nextcloud App zum benutzer hinzufügen
Beschreibung:
Ein Link zum erstellen eines Programms zum anlegen von Benutzern aus eine Benutzerliste
https://github.com/t-markmann/nc-userimporter/tree/master
Aber Falls das Projekt mal stribt, eine Version im Anhang: nc-userimporter-master.zip
Vorraussetzung
Python3 ist installiert und die Librarys
apt install python3 python-is-python3
python -m pip install --user requests
python -m pip install --user BeautifulSoup4
python -m pip install --user tabulate
python -m pip install --user qrcode
python -m pip install --user reportlab
Benutzung:
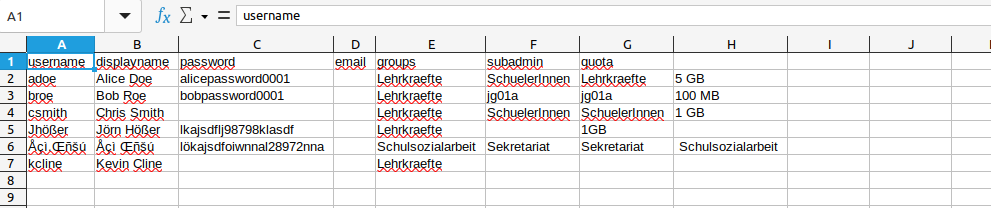
Die users.csv mit den Benutzerdaten füllen, Felder die nicht ausgefüllt werden, werden nicht gesetzt.
Nun in der config.xml die Daten anpassen.
Dieser Abschnitt ist eigentlich nur wichtig
<config>
<!-- Sensitive data! Delete this information after successful data import -->
    <cloudurl>YOUR-CLOUD-URL</cloudurl> <!-- CHANGE THIS to your cloud domain, e.g. mycloud.mydomain.org or www.mydomain.org/mycloud (without https://) -->
    <adminname>YOUR-ADMIN-USERNAME</adminname> <!-- CHANGE THIS to your cloud user, who has admin permissions-->
    <!-- Attention: Please note most special characters are not allowed in passwords, including german umlauts -->
	<adminpass>YOUR-ADMIN-PASSWORD</adminpass> <!-- CHANGE THIS to the password for that user -->
    <!-- Attention: Please note some special characters are not allowed in passwords, avoid using ) } ; # -->
Und dieser Falls man keine Semikolon getrennte CSV Datei hat.
<!-- Settings -->
    <csvfile>users.csv</csvfile> <!-- enter the name of the user-csv-file to be imported. (e.g. teachers.csv). The file must be located in the root directory of the script. Default: users.csv-->
    <csvdelimiter>;</csvdelimiter> <!-- change this to ; if you create your CSV-file with Apple Numbers -->  <!-- dieser Abschnitt interessiert uns, wenn wir es ändern wollen -->
    <csvdelimitergroups>,</csvdelimitergroups> <!-- change this to , if you create your CSV-file with Apple Numbers -->
    <pdfonedoc>yes</pdfonedoc> <!-- choose 'no' if you want to get a pdf-file for each user. choose 'yes' if you want to get a single pdf-file with all users -->
    <generatepassword>yes</generatepassword> <!-- Select yes if you want a password to be generated automatically if no password is specified in user-csv-file. Select no if you want an e-mail to be sent to the user instead with a request to e
Nun das Programm ausführen.
python3 nc-userimporter.pyFür die Installation unter Windows gibt es auf der Github seite die Exe, oder in der Wiki den Artikel Python Executable mit dem python installer, siehe hier . Dazu muss python unter Windows natürlich schon Installiert sein, siehe hier.
Mit dem installer kann man auch eine MacOS Variante bauen.